The concept of OfficeMA Timesheet is really simple. It's summarised in the image below. Your business has:
OfficeMA Timesheet is highly flexible and enables you to utilise the Client / Project feature to whichever way that suits your needs. For example for consultancy type projects you can use the Timesheet Overview report to invoice your clients, on the other hand for fixed price projects you can use the Dashboard reports to track the cost expended on these projects.
OfficeMA Timesheet also offers flexible billing rate models, for more information see the Rates and Revenue section.

To start using OfficeMA Timesheet for your business simply follow these easy steps (click the links to see an example screenshot of each step):
The account holder is the user who has created the OfficeMA Timesheet account. This account can't be deleted or edited by other users, even administrators!. Only the account holder can close the OfficeMA Timesheet account.
OfficeMA provides the following three predefined user roles:
Administrator: has full privileges and can add, view or update the details for all users. Only account holders can close the OfficeMA Timesheet account though.
Limited User: has limited privileges and can only view or update their own timesheet. If set as a manager, a limited user can update the timesheets for the users they manage.
Accountant: has read only access to the timesheet reports (Timesheet Overview). This role is suitable for any user who doesn't need to record timesheet entries, but requires access to your timesheet report such as your accountant.
The access privileges for each role are summarised in the table below:
| Feature/Role | Administrator | Limited User | Accountant | |
|---|---|---|---|---|
 Users Users |
View users | |||
| Delete users | ||||
| Disable users | ||||
| Add users | ||||
| View details | Views own details only. Rates and timesheet tasks & absences are not available | Views own details only. Rates and timesheet tasks & absences are not available | ||
| Edit general details | Contact number only | Contact number only | ||
| Edit security details | Reset password | Reset password | ||
| Edit pay & billing rates | Edit all details |
|||
| Edit timesheet tasks & Absences | Edit all details |
|||
 Business Business |
View details | |||
| Edit details (name, logo, etc...) | ||||
| View/Edit settings | ||||
| Close account | Account holder only | |||
 Clients Clients |
Create, read, update & delete | |||
 Projects Projects |
Create, read, update & delete | |||
 Timesheet Tasks Timesheet Tasks |
Create, read, update & delete | |||
 Dashboard Dashboard |
Hours Analysis Tab | If enabled in the business settings | ||
| Revenue Analysis Tab | If enabled in the business settings | |||
| User Utilisation Tab | If enabled in the business settings | |||
| Project Budget Tab | ||||
 Timesheet Timesheet |
Update Timesheet | Can manage the timesheets for all users without any restrictions |
Manages own timesheet. Cutoff period for editing can be configured in the business settings. If the user is set as a manager they can update the timesheets for the users they manage | |
| Timesheet Overview | ||||
| Timer | ||||
Administrators can view a list of all users. This view is not available to Limited Users or Accountants.

Using this view administrators can:
Note: when you add a new user, the new user will receive an email with their OfficeMA Timesheet password and a link to validate their email address.
Includes details such as first name, last name, email address, contact phone number, manager's name, and OfficeMA Timesheet's Role. If a manager is assigned then the manager can:

Note: the email address is not editable. If a user has been created with the wrong email address then you need to delete and recreate the user.

Administrators can reset the password of any user. Passwords can be entered manually or generated by the system, to have the password generated select the 'Generated' option then click the 'Update' button.
Note: the user will receive a notification email with their OfficeMA Timesheet password.
On this tab administrators can setup pay and billing rates for individual users. Pay rate is the rate paid to the user, this could be hourly, daily or a salary rate. Billing rate is the rate charged to the clients for this user if applicable.
OfficeMA Timesheet uses hourly rates internally to calculate both revenue and cost, for more details on rates see the Rates and Revenue section. These pay and billing rate details are used by OfficeMA Timesheet to generate the Dashboard reports.
Note: both the pay and billing details are optional; to skip these details simply un-check the 'Pay Rate' and 'Billing Rate' checkboxes.

Using this tab administrators can assign timesheet tasks and absences to users for them to use when completing their timesheets. This tab offers two views, a nested tree view showing clients, projects and timesheet tasks and a flat view showing tasks only. Either of the views can be used to assign timesheet tasks and absences to users.


The Add New User wizard enables you to add a new user to your OfficeMA Timesheet account. The wizard takes you through the 4 steps mentioned above, user details, security details, rates and timesheet tasks and absences.
On the business details window you can update your business name, address and logo (professional accounts only). You also view your account type and the number of user accounts. OfficeMA Timesheet can format monetary values based on your locale, for this feature to work you need to at least set the country field in the Business Details window.

The Business Settings window is accessible from the Settings → Business menu and enables you to update the following details:
Settings that control the timesheet entry and cutoff rules can be configured in this section.
| Input | Description |
|---|---|
| Timesheet Editing Allowed Days | Set this value to lock submitted timesheet entries for limited users after a number of days from the entries week ending. For example to prevent editing on Monday for last week's entries set the value to 0, set it to 7 to allow 7 more days for editing after the week ending. |
| Default Working Hours Per Day | Used by OfficeMA Timesheet to convert working hours into days for the Timesheet Overview report. |
| Maximum Timesheet Hours Per Day | The maximum timesheet hours that can be recorded per day. OfficeMA Timesheet will prevent users from exceeding this value. To restricted users to recording a maximum of 10 hours per day set this field to 10. |
| Timesheet Entry Minutes Increment | The default minutes increment on the timesheet entry. |
| Timesheet Entry Default Hours | The default hours when a user adds a new timesheet entry. The user can still change this value. |


This section controls the email reminders for timesheet completion. The reminders can be enabled by checking the 'Remind Users Daily to Complete their Timesheet for the Week' checkbox. When enabled OfficeMA Timesheet will notify your users everyday from the day you’ve selected to Friday to complete their timesheet if they haven’t done so already.
Administrators can enable manager notifications for users who do not complete their timesheet by the end of the week. Note: a user must have a manager assigned for this to work.
Compliance emails are sent to managers on Monday for the previous week. The compliance email includes a list of all users who haven't complete their timesheet for the previous week alongside the hours they have recorded. OfficeMA Timesheet multiplies the working hours for each user by 5 to determine if they are compliant or not. For part time users that work a few days a week, you need to average their hours over 5 days and enter it on their pay rate details. Otherwise they will be flagged as non compliant to their manager.
This section controls the OfficeMA Timesheet billing and revenue settings.
| Input | Description |
|---|---|
| Tax (V.A.T) Rate % | The tax rate used when calculating the gross revenue. |
| Currency | The default currency used by OfficeMA Timesheet to format currency on the reports. |
| Average Working Days Per Year | This value is used to calculate an average hourly pay rate for salaried users. |


In this section you can the set the date format used to format dates throughout OfficeMA Timesheet. The following formats are supported:
This section controls the OfficeMA Timesheet Dashboard settings. The Dashboard charts and reports by default uses the net revenue amount, to change this to use the gross amount (including taxes) change the 'Dashboard Revenue Calculations Based On' option.
By default the Dashboard Hours tab is available to limited users. To enable or disable the dashboard for limited users, choose the view type available (hours, revenue, utilisation) by checking any of 'Show hours', 'Show revenue' and 'Show utilisation' checkboxes. Note limited users will only see information and charts related to their own timesheet entries and tasks assigned to them.
This tab enables you to create absence reasons such as holidays and sick leave. Absences are different from timesheet tasks because they do not have a rate, but still your users can fill their timesheets against absences. To prevent users from recording time against an absence reason, you can either disable it or de-assign it from those users.
You can specify if an absence is paid or not and the percentage of regular pay paid to the user for the absence. OfficeMA Timesheet uses these settings in the reports to calculate the cost to your business as a result of these absences. On this tab you can also assign/de-assign absences to users.
To delete an absence click the 'Delete' button. This action will delete the absence reason and all timesheet entries recorded against it.

Administrators can view a list of all clients. This view is not available to Limited Users or Accountants.

Using this view administrators can:
When adding a new client, all the client details are optional except the client name which is required and must be unique for your Business (you can't create two clients with the same name).
This window shows all the details of your client in a single view. Two sub tabs are provided to view the client's projects and timesheet tasks. Note that all projects and timesheet tasks can also be viewed separately on the View Projects and View Timesheet Tasks windows.

Administrators can view a list of all projects. This view is not available to Limited Users or Accountants. To view projects click the 'View/Update Projects' button from the taskbar or select the Settings → Clients and Projects → Update Projects menu option.

Using this view administrators can:
To edit a project open the View Projects window then simply double click a row or select a row then click the Edit Project button.
The top section of this window shows the client name, project name and code and the project state (active/inactive).
| Input | Description |
|---|---|
| Client | When editing a project the client is readonly and can't be edited. To switch the project to another client you need to first delete the project and recreate under another client. |
| Project Name | The project name must be unique for the client. |
| Project Code | Project code. |
| Active | Active or de-activate the project. When the project is de-activated no new timesheet tasks can be created on this project. |

The Billing Details section is optional and can be used to set the billing details at the project level. If the rate billed to the client is set for the whole project then you can enter it here. Choose hourly or daily if all the timesheet tasks in this project share the same rate. Choose fixed cost if this is a fixed cost project (Note: OfficeMA Timesheet can not calculate daily revenue for tasks that use a fixed cost project rate). Finally, if the billing rate is set per task or per user then simply untick the Billing Details checkbox. For more information about rates see the Rates & Revenue section.
| Input | Description |
|---|---|
| Billing Rate | The billing rate type for this project, Choose hourly or daily if all the timesheet tasks in this project share the same rate. Choose fixed cost if this is a fixed cost project. |
| Rate (ex. Tax) | The actual rate amount excluding any taxes. |
The Budget Details section is optional and can be used to set the budgeting details for the project. You can add budget details such as budgeted cost and budgeted hours to projects, OfficeMA Timesheet will then calculate the percentage of budget expended on the project on the Project Budget report on the Dashboard.
| Input | Description |
|---|---|
| Budgeted Cost | The budgeted cost of users' hours spent working on this project. |
| Budgeted Hours | The budgeted hours that user will record against this project. |
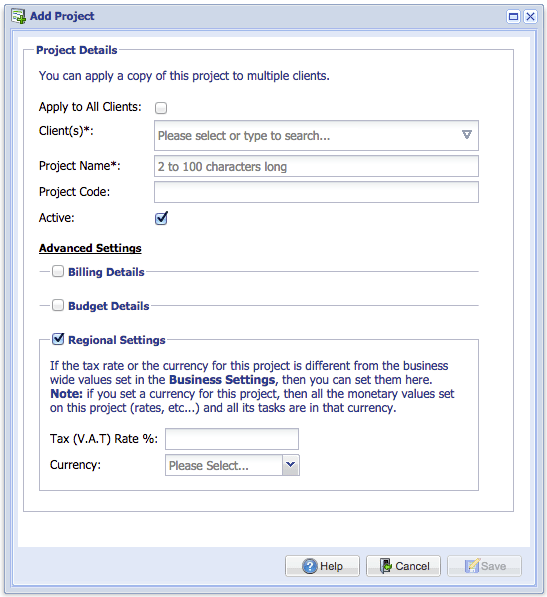
The Regional Settings section is optional and can be used to set a custom currency and tax rate for all the billable timesheet tasks for this project. The currency and tax rate set for the project will take precedence over the values set in the ‘Business Settings’ window. If a currency is set for a project, then all the monetary values set on this project (rates, etc...) and all its timesheet tasks are in that currency. For more details and an example of this feature please see this blog post.
| Input | Description |
|---|---|
| Tax (V.A.T) Rate % | The tax rate used when calculating the gross revenue for the project billable timesheet tasks. |
| Currency | The default currency used by OfficeMA Timesheet to format currency on the reports. |

The Add Project window can be launched from the View Projects window. Using this view you manually add new project(s). The project name must be unique for the client, for example you can not create two projects with the name 'Consultancy' under the same client. However, multiple projects with the same name can be created under different clients.
When creating a new project, you can create a copy on single, multiple or all clients, for example if you are creating a ‘Branding’ project across all clients simply tick the 'All clients' checkbox. To apply a copy of the project to one or more clients simply select the clients names from the 'Client(s)' dropdown list.
At the core of OfficeMA Timesheet is the ability to create timesheet tasks for clients' projects.
Administrators can view a list of all timesheet tasks. This view is not available to Limited Users or Accountants. To view the timesheet tasks click the 'View/Update Timesheet tasks' button on the taskbar or select the Settings → Business → Timesheet Tasks menu option

Using this view administrators can:
To edit a task open the Timesheet Tasks window then simply double click a row or select a row then click the Edit Task button.
The top section of this window shows the project name, task name and code and the task state (active/inactive).
| Input | Description |
|---|---|
| Project | When editing a task the project is readonly and can't be edited. To switch the task to another project you need to first delete the task and recreate under another project. |
| Task Name | The task name must be unique for the project. |
| Task Code | Task code, OfficeMA Timesheet will show the code as part of the task name throughout the application. |
| Active | Active or de-activate the task. When the task is de-activated no new timesheet entries can be recorded against this task even if it's assigned to users. Inactive tasks can't be assigned to users. |

Each Timesheet Task must be assigned a rate if the task is billable. For non billable tasks select 'None' as the billing rate. For more information about rates see the Rates & Revenue section.
| Input | Description |
|---|---|
| Billing Rate | The billing rate type for this task. Set the billing rate to Hourly or Daily if the rate billed to the client is per task. User if you bill for this task based on the user rate. Project if the billing rate is fixed for the whole project. None if the task is not billable. |
| Rate (ex. Tax) | The actual rate amount excluding any taxes. |
The Add Timesheet Task window can be launched from the View Timesheet Tasks window. Using this view you can manually add new timesheet task(s). The task name must be unique for the project, for example you can not create two tasks with the name 'Development' under the same project. However, multiple tasks with the same name can be created under different projects.
When creating a new timesheet task, you can create a copy on single, multiple or all project, for example if you are creating a ‘Software Coding’ task across all projects simply click the 'Select All' button on the projects tree. Note: only active projects for active clients will be shown in projects tree.


There are three different routes to assign timesheet tasks to users:
See the screenshots below for an example of each option

Both administrators and limited users have access to this view. This view is not available to Accountants. Users can use this view to manually record timesheet entries. Timesheet entries recorded using the timer Window, the Chrome timer extension or the Mobile Apps are also displayed here. By default OfficeMA Timesheet shows a weekly view for the current week. This is indicated by the title 'Timesheet entries for week commencing xx/xx/xxxx'. The calendar on the left (1) can be used to navigate to a different week.
Note: Updating or modifying past timesheet entries can be restricted for limited users, for more information see the Timesheet Editing Allowed Days Business Settings section.

The numbered areas in the screenshot above are explained in this table:
| # | Area | Description |
|---|---|---|
| (1) | Calendar | Click any day on the calendar to change the week of entry. The week starts on Monday and ends on Sunday. |
| (2) | Custom Date Range | By default the timesheet entry range is restricted to a week (Monday to Sunday). Use the custom date range to choose a custom date range, for example a month. By default when adding a new timesheet entry OfficeMA Timesheet increments the date field. If you want to enter multiple entries on the same date then you can set both the start date and end date to that date and click the apply button, now whenever you add a new entry the date field stays the same. To clear the custom date range simple click on the calendar on the left (1). |
| (3) | Current User | View and update the timesheet entries for a particular user. Limited users are not able to change this field unless they are a manager in which case they can choose from the list any of the users they manage. Administrators are able to select any of the users without restrictions. |
| (4) | Action Buttons |
|
| (5) | Timesheet Entry Table |
Click any of the cells to edit its value.
|
| (6) | Filter and Paging Toolbar | You can use the bottom section of the timesheet entry to search or page through large results within the current date range. |
This view can be used to record multiple timesheet entries at once, this is particularly handy when booking holidays. Simply select the date range, select the day of the week on which entries should be recorded, enter the number of hours/minutes, select the tasks you want to book then click the 'Save' button. The entries recorded here should appear on the timesheet entry table.
For example to book a day off 'Annual Leave' every Monday for the next 4 weeks, simply choose the date range to mark the beginning and end of the 4 weeks then select 'Mon' as the day, enter the number of hours/minutes, choose 'Annual Leave' from the tasks tree, then click 'Save'.
Note: Limited users restrictions set by administrators still apply when using the multiple timesheet entries view.

The timesheet timer window can be used to track the exact time spent on current tasks. To launch the timer simply click on the timer icon on the toolbar.
When the Timer window launches select the task, enter some notes (optional) then hit the ‘Start Timer’ button. Once the timer is started you can pause it or resume it as needed. When the task is done click the ‘Stop Timer’ button which will save the progress as a timesheet item. Please note that seconds are rounded half way up to a minute.
The timesheet item saved by the timer can be edited like any other timesheet entry on the ‘Update Timesheet Window’.
OfficeMA Timesheet timer is also available as Android and iOS mobile application and as a Chrome extension. See the tools page for more information.

Timesheet Overview window enables you to generate revenue reports from your business's timesheet entries and export them as CSV or PDF. This view is accessible to both administrators and accountants and is divided into two sections: filters and timesheet entries.

Use the 'Filters' section to search for specific timesheet entries. Entries can be viewed in hours or days. OfficeMA Timesheet uses 'Default Working Hours Per Day' in the Business Settings Window to convert hourly rates to daily rates and vise versa. Remember to click the 'Apply Filters' button if you modify any of the filters.
| Field | Description |
|---|---|
| Start Date / End Date | The date range to display, by default this is set to the last 7 days. |
| Units | Choose Hours or Days. Hours are selected by default |
| User | By default timesheet entries are displayed for all users. To display the timesheet entries for particular users, select those users by holding the 'CTRL' key and clicking the user. |
| Clients, projects, timesheet tasks and absences tree | By default all entries are shown for the date range selected. To only show entries for a particular client, project, task or absence, check the relevant entry on this tree. |
| Reset Filter | Reset all the filters to the defaults. |
| Apply Filter | Apply the current filters. |
The 'Timesheet Entries' displays all the timesheet entries for the current filter criteria. The Net, Gross and Tax (VAT) values are calculated based on the Rate type defined on the Timesheet Task Window. Using the buttons on the toolbar you can group by the various fields. OfficeMA Timesheet provides a summary for each group, to turn the summary off or on click the 'Toggle Summaries' button.
The currency format and tax rates used on this view are explained in the Business Settings and Rates & Revenue sections. Many features are accessible from the column headings such as sorting, columns to show/hide and grouping. Any non billable tasks or absences are shown in Red, tasks using fixed cost project rates are shown in Blue. To export or print the current timesheet entries simply click the export or print icons on the toolbar.

The Timesheet Overview window enables you to generate an invoice from your business's billable timesheet entries. Invoices are generated in Word Document (DOCX) format, an example invoice generated by OfficeMA Timesheet can be downloaded here. Note: This functionality is only available to users with Professional accounts.
An inovice can only be generated for one client at a time. To generate an invoice select one or more tasks/projects for the same client, select the Units (days or hours) and click the apply button, finally click the Generate Invoice button. The invoice addresses and logo will use the following OfficeMA Timesheet data:

OfficeMA Timesheet enables you to create billing rates against projects, users and timesheet tasks. Since timesheets are recorded in hours and minutes, OfficeMA Timesheet uses hourly rates in the calculations so both Daily and Salary rates are converted to hourly.
OfficeMA Timesheet's Rate has an amount and a type. The type can be Hourly, Daily, Salary or Fixed as illustrated on the image on the right below. The Salary type is only used for the user's pay rate. The Fixed rate is only used for projects. For each timesheet task you can decide which rate (project, user, task or none) will be used to generate the timesheet overview revenue report and the revenue analysis report on the Dashboard.


You can use this list as a guide to choosing a billing rate for timesheet tasks:
For users you can also create a pay rate, which represents how much you are paying your users. OfficeMA Timesheet uses this rate to calculate your profit margin for tasks performed by this user (see the Dashboard Reports section). To calculate the cost of each user, OfficeMA Timesheet uses the pay rate on the user. If this rate is set to salary then an hourly rate is calculated as follows:
User's hourly cost = salary / (working days per year {from the Business Settings} x the user working hours per day)
OfficeMA Timesheet supports the display of a wide range of international currencies. Whenever currency values are displayed in tables or reports, OfficeMA Timesheet formats them according to the currency and country you set for your business. Note that values are entered in decimal format.
To benefit from this feature you simply need to update the country for your business by clicking the ‘Business Details’ icon on the toolbar, then on the ‘Business Details’ window choose your country from the ‘Country’ list and click the ‘Update’ button.
To update the currency click on the ‘Settings’ icon on the toolbar, then on the ‘Settings’ window choose your currency from the ‘Currency’ list and click the ‘Save’ button.
There might be a requirement for a particular project to have its own currency and tax rate. In this case OfficeMA Timesheet provides the ability to set a custom currency and tax rate per project. This is available from the Regional Settings on the project window. For more details and an example of this feature please see this blog post.
OfficeMA Timesheet's dashboard is where everything comes together to give you an insight into your business's performance in terms of revenue and user utilisation. The dashboard features many charts, with the ability to download the raw data as CSV (available for the Professional accounts only).
To make the most of this dashboard and its reports you need to ensure that all non working tasks are entered as absences in the ‘Absences’ window. Also all billable tasks need a billing rate set. In terms of cost, you need to ensure that all your users have a pay rates set. For project budget and expenditure you need to ensure that the budget details on each project are populated.
The dashboard features the following tabs:
Click the screenshots below to enlarge


OfficeMA Timesheet provides the ability to export and import your data at anytime. All the grid views used to browse Users, Clients, Projects, Timesheet Tasks and Timesheet Entries can be used to import or export data. The image on the right shows the icons that can be used for these functions. If you click on any of the export buttons the data currently displayed will be exported. If you want to export all of your data you can click the small arrow on the export icons to reveal an ‘Export All’ option.


Bulk import is available by clicking the import icon on the toolbar of any of the grid views. Using bulk import you can easily import hundreds of users, clients, projects and timesheet tasks in seconds. Note: this feature is available for the Professional accounts only.
To import your data into OfficeMA Timesheet use the following templates: